|
|
Template Editor is a functionality in MiScout SCADA Desk enabling a user to create specific templates for generating reports based on the prior selected channels and logs. This provides a possibility to neatly organize monitoring of almost all data supported by the controller firmware.
To reach Template Editor, the corresponding Report Generator (mtplReportGenerator.bpl) plug-in must be already listed in the Plugin Configuration dialog. If the required plug-in is available, the Report Generator tab will appear on the main application ribbon. In case the required plug-in is not on the list, a user can easily upload it. For more detail information, refer to Configuring Plug-ins.
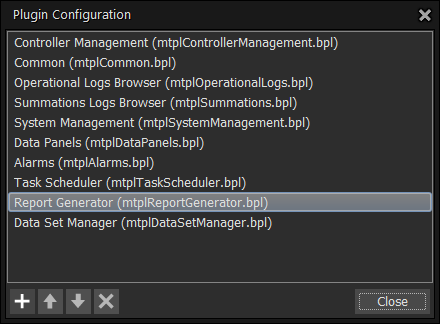
As soon as the corresponding plug-in has been added to Plugin Configuration, the Report Generator tab becomes available on the main application ribbon. Therefore, click the Report Generator tab to open its toolbar. In the Show section of the toolbar you can access the Template Editor icon.

As a result, a blank Template Editor window will be displayed on the main screen. Also, Template Editor toolbar will be activated. On clicking the Add icon on the toolbar a user can reach a list of default report templates.
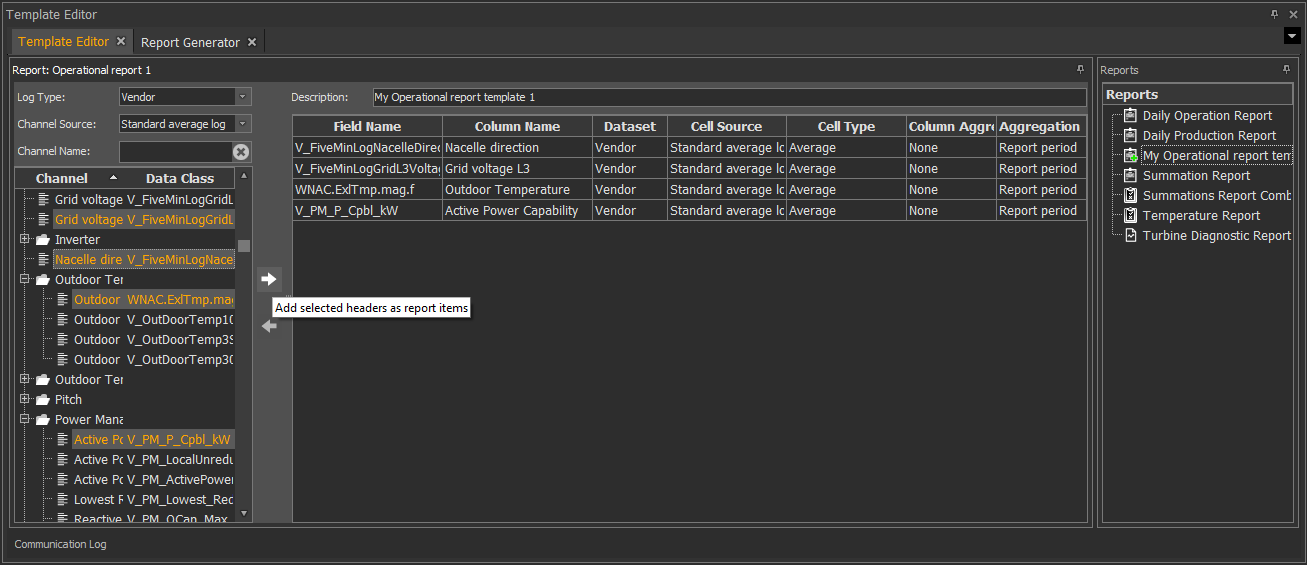
In the Reports section to the right you can select one of the available report templates by clicking them. These reports contain a pre-defined set of properties, which a user can easily change by selecting other values in the drop-down menu of the table cells. For example, let's click the Daily Operation Report to see its set of properties.
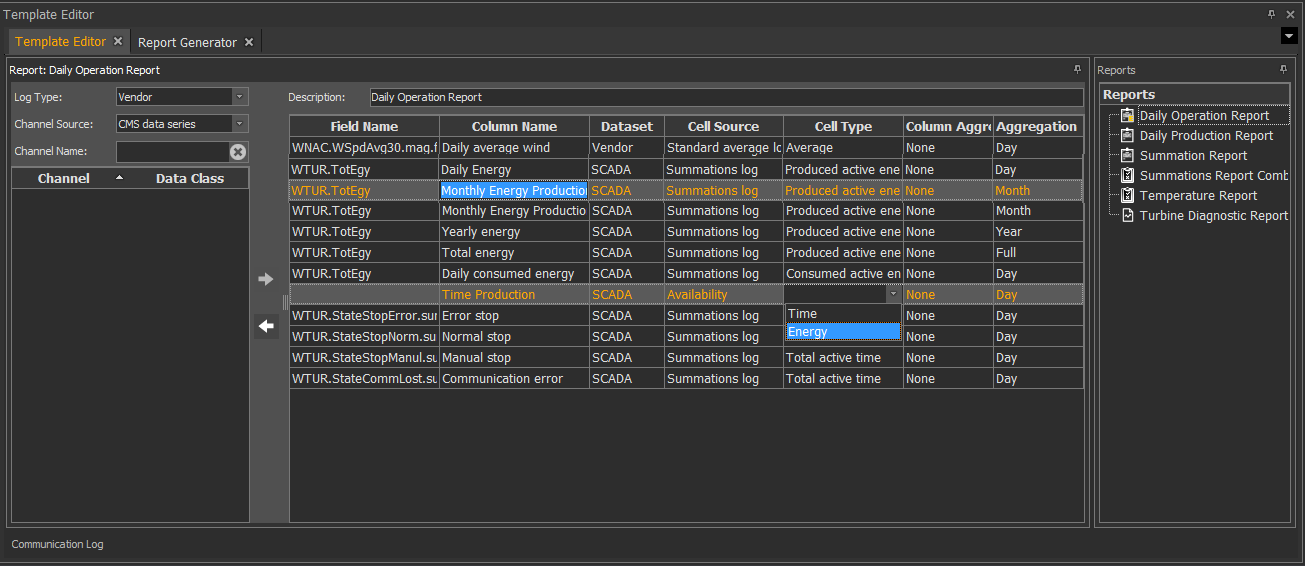
In the window central part you can see a list of all data classes already included to the current report template. The data classes table contains the following columns:
Settings of the below columns can be changed by clicking the arrow icon next to the cell name.
Some options of the Aggregation period cell need more detail explanation, including
On changing report template default settings its icon will be marked with an orange color, so that you have to save new settings by pressing the  Commit Changes icon at the left top of the min application. As a result, all your recent settings will be saved. Otherwise, you can withdraw these changes by clicking the
  Rollback Changes icon.
Creating new report templates
With the help of Template Editor, a user can create his own report templates based on the default ones. Therefore, to configure a new report template, follow the workaround step by step as described below.
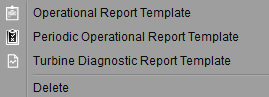
1. First, click the Add icon residing in the Modify section on the toolbar and select one of the available report templates from the drop-down menu.
Alternatively, right-click within the Reports panel to open the context-menu and select the appropriate report template by clicking it.
As a result, a blank Template Editor window specific to the selected report type will reveal within the main monitoring area.
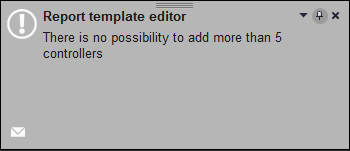
2. Select the unit(s) in the Controller View by selecting the appropriate check-boxes. As soon as the required units are selected, all available channels will be automatically loaded. Also, the downloaded channels will be displayed under the Channels.list. Additionally, the Communication Log panel will be loaded at the bottom of the main window.
Note. The maximum number of units, which can be selected at a time for the selected report template is limited to 5. On selecting more than 5 units a special dialog message will appear on the main screen.
3. Specify an appropriate name for a new report template.
4. Specify the property fields for the new report template.
5. Select the required channels by clicking them and press the ![]() arrow icon to move them to the middle part of the Template Editor window. If successful, all prior selected channels will be loaded to the report template window.
arrow icon to move them to the middle part of the Template Editor window. If successful, all prior selected channels will be loaded to the report template window.
6. If required, change settings of the table cells. For more detail information, refer to Configuring report templates
7. On completing the configuration process, click the Commit Changes icon at the left top corner of the main application window. As a result, all your recent settings will be saved.
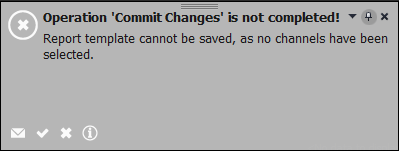
Note. Prior to saving a report template by pressing the Commit Changes icon, make sure that you have prior uploaded all required channels. Otherwise, a special dialog window containing a corresponding message will appear on the screen.
Otherwise, you can withdraw these changes by clicking the Rollback Changes icon.
Now that the new template has been successfully created, a user can use it to generate a report with the help of the Report Generator icon residing on the toolbar next to the Template Editor icon. For further instructions on how to generate a report using a template, refer to Template based Report found in the Report Generator section of the manual.
Report generation using template(s)
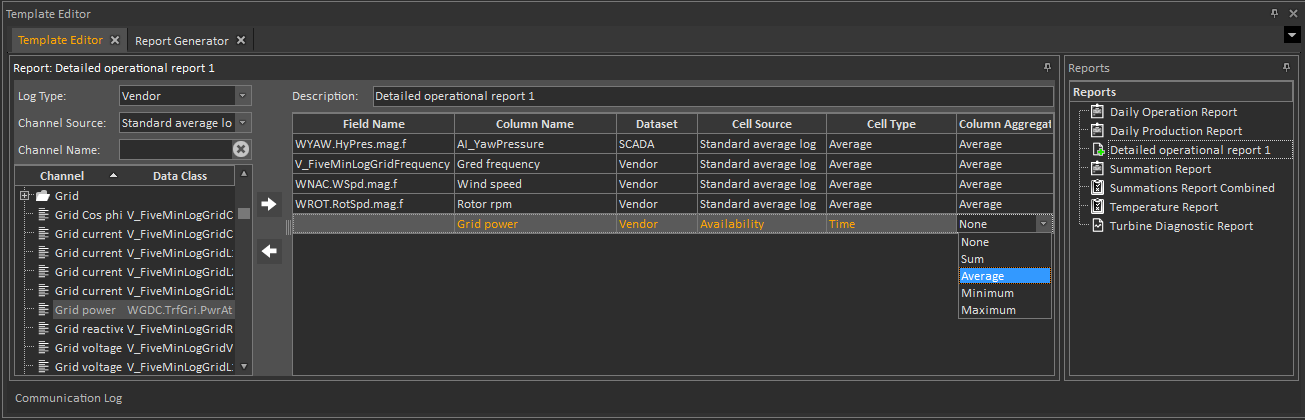
User can use the recently created template for report generation. For more detail information, refer to Report generation using template(s). The process of generating a report using a ready template is similar to that used for generating other report types. For more information, refer to Main steps to generate a report described in the Report Generator section. For example, in this way we can create and configure a "Detail operational report 1" based on the default template called Detailed Operational Report Template. Its possible configuration is shown in the screen below.
As soon as a new report template is saved, it can be used in the Report Generator for generating a report. For more detail information, refer to Detailed operational report 1 described in the Report Generator chapter.